
To install Rainx wiper blades, follow these steps: remove old blades, attach new blades, and test for proper functionality. Now let’s dive into the details of how to install Rainx wiper blades for clear and effective windshield wiping.
Are you tired of struggling with poor visibility during rainy weather? Installing Rainx wiper blades can help improve your windshield’s wiping performance. These wiper blades are known for their durability and ability to repel water, ensuring a clear view while driving in the rain.
In this guide, we will walk you through the simple steps to install Rainx wiper blades effortlessly. By following these instructions, you’ll be equipped with a reliable wiping system that will enhance your safety on the road, even in the harshest weather conditions. So let’s get started!

Credit: www.amazon.com
Reasons To Install Rainx Wiper Blades
When driving in rainy conditions, enhanced visibility is crucial for safe navigation on the road. RainX Wiper Blades are designed to provide a clear and streak-free wipe, ensuring a clear view of the surroundings. By eliminating the need for constant adjustments and manual wiping, these blades offer a convenient solution for a hassle-free driving experience.
Moreover, RainX Wiper Blades are specially engineered to improve safety on the road. With their advanced technology, they effectively remove rain, snow, and debris, preventing distractions and allowing drivers to maintain focus. This not only reduces the risk of accidents but also enables quick reaction times when faced with unexpected situations.
| Protects Windshield from Scratches and Damage |
|---|
| RainX Wiper Blades are equipped with a durable and flexible design, providing efficient and gentle contact with the windshield surface. This reduces the likelihood of scratches and damage caused by abrasive materials or debris. By acting as a barrier, these blades help preserve the integrity of the windshield, ultimately extending its lifespan. |
Tools And Materials Needed
To install Rainx wiper blades, gather the necessary tools and materials such as the new wiper blades, a small flathead screwdriver, and a soft cloth. Ensure that you have these items on hand before beginning the installation process.
Rainx Wiper Blades
- Soft cloth or towel
- Automotive cleaner or soapy water
- Screwdriver (if required)
Installing Rainx wiper blades is an easy process that can greatly improve your visibility on the road. To begin, ensure that you have the necessary tools and materials at hand. These include RainX wiper blades, a soft cloth or towel, automotive cleaner or soapy water, and a screwdriver (if required).
Start by removing the old wiper blades from your vehicle. Use the screwdriver to carefully loosen any screws or fasteners that may be holding the old blades in place. Once removed, take the time to clean the wiper arm with a soft cloth or towel, using automotive cleaner or soapy water to remove any debris or dirt.
Next, take your new RainX wiper blades and carefully align them with the wiper arm. Ensure that they are securely attached by tightening any screws or fasteners that may be provided. Once properly installed, test the wiper blades to ensure that they are functioning correctly.
In summary, installing Rainx wiper blades requires the use of basic tools such as a screwdriver, as well as a soft cloth or towel and automotive cleaner or soapy water to clean the wiper arm. By following these simple steps, you can easily replace your old wiper blades and enjoy improved visibility during rainy conditions.
Step 1: Purchase The Right Rainx Wiper Blades
To install RainX wiper blades, the first step is to purchase the right ones for your vehicle. When exploring different RainX wiper blade options, consider factors such as the correct size and additional features. Make sure to choose the correct size that matches your vehicle’s specifications. This information can usually be found in the owner’s manual or by checking the existing wiper blades. Additionally, consider the type of blade you want, such as beam-style or hybrid blades, which offer different benefits. Beam-style blades are known for their sleek design and even pressure distribution, while hybrid blades combine the advantages of traditional and beam-style blades. By selecting the appropriate RainX wiper blades, you can ensure optimal performance and visibility during rainy conditions.
Step 2: Prepare For Installation
To install Rainx wiper blades, the second step is to prepare for the installation. Ensure you park your vehicle in a safe and well-lit area. Make sure the wipers are in the off position. Lift the wiper arm away from the windshield for easy access to the wiper blade.
Step 3: Remove The Old Wiper Blades
Locate the release tab or button on the wiper blade.
Depress the tab or press the button to unlock the blade.
Gently slide the blade off the wiper arm.
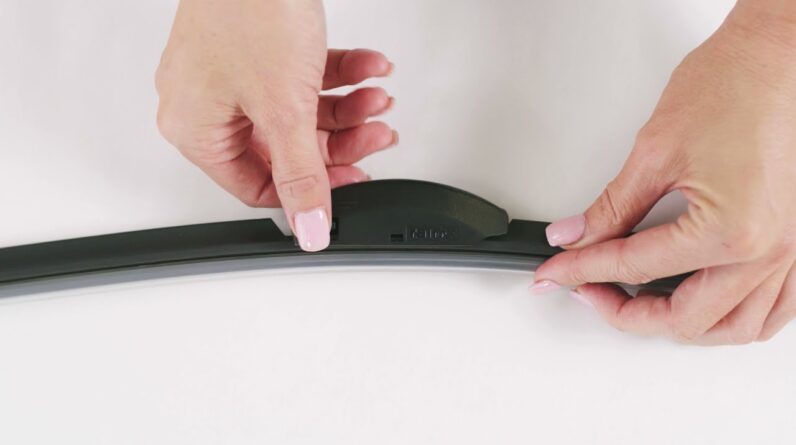
Step 4: Install The Rainx Wiper Blades
To install RainX wiper blades, follow these steps:
- Align the new RainX wiper blade with the wiper arm.
- Push the blade onto the wiper arm until it clicks into place.
- Double-check that it is securely attached.
By aligning the new RainX wiper blade with the wiper arm, you ensure proper installation. Pushing the blade onto the wiper arm until it clicks into place ensures that it is securely attached. Remember to double-check the attachment to avoid any issues.
Step 5: Test The Wiper Blades
Ensure a successful installation of Rainx wiper blades by thoroughly testing them in step 5. Confirm their functionality and effectiveness before hitting the road.
Installing RainX wiper blades is a simple process. Once you have followed Steps 1 to 4, it is time to test the wiper blades. Lower the wiper arm back onto the windshield and activate the wipers. Observe the movement of the blades, ensuring it is smooth and even. Pay attention to any jerking or skipping motions, as this indicates a problem. Next, verify that the RainX wiper blades are effectively clearing the windshield. Check for any streaks or missed spots. The goal is to have a clear and unobstructed view while driving in rainy conditions. If there are any issues with the performance of the wiper blades, it may be necessary to reevaluate the installation or consider purchasing a different brand. Regularly maintaining your wiper blades is crucial for your safety on the road, so don’t ignore any signs of reduced effectiveness.Step 6: Clean And Care For The Wiper Blades
Regularly cleaning and caring for your wiper blades is essential to ensure their optimal performance. To clean the wiper blades, use automotive cleaner or soapy water along with a soft cloth or towel. These materials will help remove any dirt and debris that may have accumulated on the blades.
When cleaning the wiper blades, it is important to avoid using harsh chemicals or abrasive materials. These can cause damage to the blades and reduce their effectiveness. Instead, stick to gentle and non-abrasive cleaning solutions and materials.
Step 7: Additional Tips For Optimal Performance
It is recommended to replace your wiper blades every 6-12 months or as needed to ensure they are in good condition. This will help maintain their effectiveness and prevent issues such as streaking or skipping.
In addition to regular replacement, applying RainX windshield treatment is a great way to enhance water repellency on your windshield. This treatment creates a hydrophobic barrier that helps water bead up and quickly slide off, improving visibility in wet weather conditions.
Keeping your windshield clean is also crucial for optimal wiper blade performance. Regularly cleaning the windshield surface helps remove dirt, debris, and other contaminants that can cause the wiper blades to function less effectively.
By following these additional tips, you can ensure that your RainX wiper blades provide superior performance and help you maintain a clear view of the road ahead.
Step 8: Troubleshooting Common Issues
When you encounter streaking or skipping with your Rainx wiper blades, there are a few troubleshooting steps you can take to resolve the issue.
- Ensure that the wiper blades are correctly installed according to the manufacturer’s instructions.
- Double-check that they are securely attached to the wiper arm to prevent any wobbling or movement during operation.
Inspect the wiper blade for damage or wear:
- Examine the rubber blade for any signs of damage, such as cracks or tears.
- If the blade is worn or damaged, it is recommended to replace it with a new one to ensure optimal performance.
Step 9: Seek Professional Help If Needed
To ensure the correct installation of your Rainx wiper blades, it is important to seek professional help if needed. Consulting a trusted mechanic or automotive service center can provide assistance for any difficulties or concerns with the installation process. They have the necessary expertise and knowledge to guide you through the installation process and ensure that the wiper blades are properly maintained and functioning effectively. Seeking professional help can also help to avoid any potential damage to your vehicle or the wiper blades themselves. By relying on the expertise of professionals, you can be confident in the correct installation and maintenance of your Rainx wiper blades.
Step 10: Enjoy Clear Visibility With Rainx Wiper Blades
Elevate your driving experience with RainX wiper blades. Achieve improved visibility, especially during rainy and inclement weather conditions. Say goodbye to streaks and smudges on your windshield as RainX wiper blades ensure a clear view of the road ahead. Feel confident and safe as you navigate through any weather with RainX’s advanced technology. These wiper blades are designed to provide long-lasting performance, making them a reliable choice for all your driving needs. Trust RainX to deliver a high-quality product that enhances your driving comfort. Enjoy uninterrupted views and a smooth journey with RainX wiper blades.
Frequently Asked Questions For How To Install Rainx Wiper Blades
How Do I Install Rain-x Wiper Blades?
To install Rain-X wiper blades, start by removing the old ones. Lift the wiper arm away from the windshield and locate the release tab on the blade. Push the tab and slide the blade off the arm. Then, simply attach the new Rain-X wiper blade by sliding it onto the arm until it clicks into place.
Repeat the process for the other wiper blade.
What Size Rain-x Wiper Blades Do I Need?
To determine the correct size of Rain-X wiper blades for your vehicle, you can refer to the owner’s manual or measure the length of the old wiper blades. Alternatively, you can use an online wiper blade size finder tool by entering your vehicle’s make, model, and year.
This will provide you with the accurate size of Rain-X wiper blades you need.
How Often Should Rain-x Wiper Blades Be Replaced?
Rain-X wiper blades should be replaced every 6 to 12 months, or as soon as you notice a decline in performance. Over time, the rubber on the blades can deteriorate, leading to streaks, skipping, or reduced visibility. It is important to regularly inspect and replace your Rain-X wiper blades to ensure optimal driving visibility in all weather conditions.
Conclusion
Installing Rain-X wiper blades is a simple and effective way to improve your visibility in rainy weather. By following the steps outlined in this guide, you can easily replace your old wiper blades with new ones. Remember to choose the correct size for your vehicle and follow the manufacturer’s instructions.
Regularly replacing your wiper blades will ensure clear and safe driving in any weather condition. Upgrade your wipers today and experience the difference!


