To install drip irrigation to an existing sprinkler system, you need to follow these steps: adjust the existing sprinkler heads, install a backflow preventer, connect the drip tubing, and add the necessary fittings and emitters. This process allows for efficient water usage and targeted plant watering.
In turn, it helps conserve water and reduces water runoff. Moreover, by utilizing a combination of sprinklers and drip irrigation, you can customize your irrigation system to best suit the specific needs of your landscape. Whether you have flower beds, shrubs, or vegetable crops, incorporating drip irrigation into your existing sprinkler system can ensure that your plants receive precise and adequate water supply without wasting any water.
Why Upgrade Your Sprinkler System With Drip Irrigation?
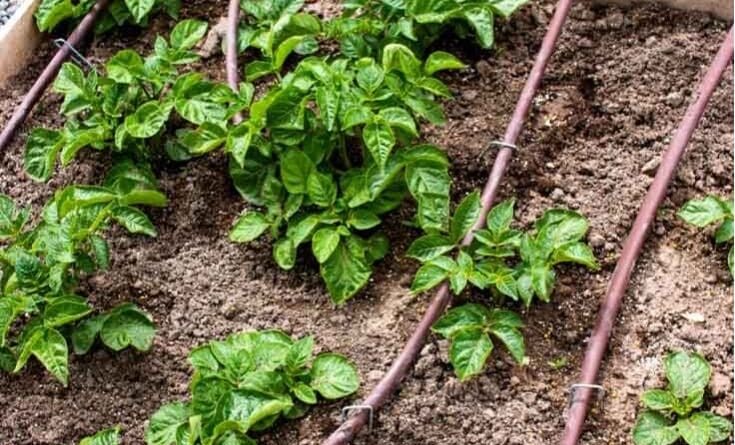
Upgrading your sprinkler system with drip irrigation can bring numerous benefits, making it a worthwhile investment for your garden. One of the key advantages of drip irrigation over traditional sprinkler systems is water conservation. With drip irrigation, water is delivered directly to the plant roots, minimizing evaporation and ensuring that moisture reaches the desired areas without wastage. This targeted approach results in significant water savings compared to overhead sprinklers.
Moreover, drip irrigation systems have a positive environmental impact. By reducing water usage, they help in conserving this precious resource. Additionally, the precise delivery of water greatly minimizes the risk of weeds and pests as water is supplied directly to the plants, preventing unnecessary moisture accumulation.
| Benefits of Drip Irrigation: | Water-saving advantages: | Environmental impact: |
| – Direct delivery to plant roots | – Minimizes evaporation | – Conserves water resources |
| – Reduces water wastage | – Ensures targeted moisture | – Prevents unnecessary moisture |
| – Decreases risk of weeds and pests |
Step 1: Evaluate Your Existing Sprinkler System
Assessing the condition and efficiency of your current sprinkler system is the first step to successfully installing drip irrigation. Start by identifying potential problem areas and areas for improvement. Look for any leaks, broken or misaligned sprinkler heads, or uneven coverage. Consider the overall water usage and whether your system is applying water evenly across the lawn or garden.
Compatibility with drip irrigation is another important factor to consider. Evaluate the layout and design of your current system to determine if it can easily accommodate the addition of drip irrigation components. Take note of any areas where drip lines or emitters may conflict with existing sprinkler heads or other elements of the system.
By thoroughly evaluating your existing sprinkler system, you can identify areas for improvement, address any compatibility issues, and ensure a successful installation of drip irrigation. This will help you conserve water, improve the efficiency of your irrigation system, and promote healthier plants.
Step 2: Planning Your Drip Irrigation System Upgrade
In Step 2 of installing a drip irrigation system to your existing sprinkler system, it is important to plan ahead. Understanding the layout and needs of your landscape is crucial to ensure proper irrigation. Before you begin, calculate the water requirements and flow rates for your drip irrigation system. This will help determine the amount of water needed for each plant or area in your landscape. It is recommended to determine the type of drip irrigation system suitable for your landscape as well. This will depend on factors such as the size of your landscape, the types of plants you have, and your water source. Taking the time to plan and calculate these details will result in a more effective and efficient drip irrigation system that meets the specific needs of your landscape.
Step 3: Gathering The Required Materials And Tools
|
Step 3: Gathering the Required Materials and Tools When installing a drip irrigation system to an existing sprinkler system, there are several essential components that you will need. These components include:
In addition to the essential components, you will also need tools for the installation and maintenance of the system. These tools include:
When sourcing materials for your drip irrigation system upgrade, it is important to consider the quality of the components while staying within your budget. Look for reputable suppliers that offer high-quality products at competitive prices. Check customer reviews and ratings to ensure the reliability and durability of the materials. By gathering the necessary materials and tools, you will be one step closer to installing a successful drip irrigation system to your existing sprinkler system. |
Step 4: Installing Drip Irrigation System
In this step, we will focus on installing the drip irrigation system to your existing sprinkler system. Before you begin, ensure that you have prepared the area properly. Clear any debris, remove any obstructions, and ensure that the soil is ready for installation.
Next, lay out the drip irrigation lines and emitters in the desired areas of your garden or landscape. Make sure to space the emitters properly according to the specific watering requirements of your plants. This will ensure that each plant receives the appropriate amount of water.
Once the lines and emitters are in place, it’s time to connect the drip system to a water source. This can be done by tapping into your existing sprinkler system or by connecting to an outdoor faucet. Make sure to use the appropriate fittings and connectors for a secure and leak-free connection.
By following these steps, you will be able to successfully install a drip irrigation system to your existing sprinkler system. This will help you conserve water, provide targeted irrigation to your plants, and ensure a healthy and thriving garden or landscape.
Step 5: Maintaining Your Drip Irrigation System
Regular inspection and monitoring of your drip irrigation system is essential for maintaining its efficiency. Check for leaks and clogs in the system on a regular basis. This can be done by visually inspecting the system for any signs of water leaks or wet spots in the ground. You can also check each component of the system, including the pipes, fittings, and emitters, to ensure they are functioning properly. Adjust the water flow and pressure as needed to ensure optimal irrigation. This can be done by adjusting the flow control valves or using pressure regulators. Proper winterization and seasonal maintenance are also important for the longevity of your system. Before the winter season, make sure to drain the water from the system to prevent freezing and potential damage. Additionally, clean any debris from filters and emitters to prevent clogs. By following these maintenance tips, you can ensure that your drip irrigation system continues to provide efficient and effective watering for your plants.
Step 6: Maximizing Efficiency And Water Savings
Implementing smart irrigation controllers and sensors is a crucial step in maximizing efficiency and water savings when installing a drip irrigation system to an existing sprinkler system. These controllers and sensors allow for precise watering scheduling and programming, ensuring that water is only applied when and where it is needed. Smart controllers can adjust watering based on weather conditions, soil moisture levels, and plant needs, helping to prevent overwatering and water waste. Additionally, supplementing drip irrigation with rainwater harvesting can further enhance water savings. By collecting and utilizing rainwater, you can reduce reliance on municipal water sources and conserve this valuable resource for future use. This sustainable approach to irrigation not only benefits the environment but also helps save on water bills in the long run.
Step 7: Troubleshooting Common Issues
Identifying and troubleshooting common problems with drip irrigation:
| Problem | Possible Cause | Solution |
|---|---|---|
| System Leaks | Loose connections or damaged components | Tighten connections or replace damaged parts |
| Clogged Emitters | Sediment buildup or debris | Flush the system regularly; clean or replace clogged emitters |
| Uneven Water Distribution | Pressure variation or incorrect emitter spacing | Adjust pressure regulators and ensure proper emitter placement |
Tips for maintaining system performance and resolving issues:
- Regularly inspect the system for leaks and make necessary repairs
- Clean filters and screens to prevent clogging
- Monitor water pressure and adjust regulators accordingly
- Ensure proper installation and spacing of emitters
- Address any vegetation or roots that may be causing blockages
- Keep a record of maintenance activities for future reference
Step 8: Enhancing Your Landscape Design With Drip Irrigation
The final step in enhancing your landscape design with drip irrigation is to utilize it for specific landscape features, such as flower beds or vegetable gardens. Drip irrigation is particularly effective for these areas as it delivers water directly to the root zone, promoting healthy growth and reducing water waste. It is also a great solution for incorporating irrigation into slopes, hills, and challenging terrain where traditional sprinkler systems may not be as efficient. By strategically placing drip emitters along the slope, you can ensure that every plant receives the necessary amount of water. Additionally, drip irrigation allows for creative customization, enabling you to improve the aesthetics of your landscape. You can hide the tubing beneath mulch or decorative rocks and use adjustable drip emitters to create different watering zones for different types of plants. With the versatility and efficiency of drip irrigation, you can truly enhance the beauty of your landscape while conserving water.
Step 9: Advanced Techniques And Innovations In Drip Irrigation
Step 9: Advanced Techniques and Innovations in Drip Irrigation
Exploring advanced drip irrigation techniques, such as subsurface drip systems, can provide significant benefits for existing sprinkler systems. Subsurface drip systems involve placing the drip lines directly below the soil surface, allowing water to be delivered directly to the roots of plants. This technique minimizes evaporation and ensures more efficient water distribution.
In addition to subsurface drip systems, there are several innovative products and technologies available for drip irrigation. These include pressure-compensating drippers that maintain a consistent flow rate regardless of changes in pressure, and self-cleaning filters that prevent clogging and reduce maintenance.
Automation and remote control are also important advancements in drip irrigation systems. With automated timers and sensors, irrigation can be scheduled and adjusted based on specific plant needs and weather conditions. This level of control not only saves water but also ensures optimal growth and performance of plants.
By incorporating these advanced techniques and innovations into an existing sprinkler system, you can enhance the efficiency and effectiveness of your drip irrigation setup.

Credit: www.amazon.com
Frequently Asked Questions For How To Install Drip Irrigation To Existing Sprinkler System
How Do I Install Drip Irrigation To My Existing Sprinkler System?
To install drip irrigation to your existing sprinkler system, you will need to attach a pressure regulator, filter, and tubing. Connect the tubing to the existing sprinkler system and lay it out in your garden or landscape. Install emitters or drippers along the tubing to deliver water directly to the plants.
Conclusion
Installing drip irrigation to an existing sprinkler system is a smart way to save water and ensure precise plant hydration. By following the steps outlined in this blog post, you can seamlessly upgrade your irrigation system without the need for major modifications.
Remember to adequately plan the placement of drip lines and choose the right emitters for optimal water distribution. With this simple yet effective upgrade, you can achieve a more efficient and eco-friendly irrigation system for your garden.

