
To install a pocket door handle, first, measure and mark the desired height for the handle on the door. Then, align the handle with the marking and secure it into place using screws provided in the installation kit.

Credit: www.amazon.com
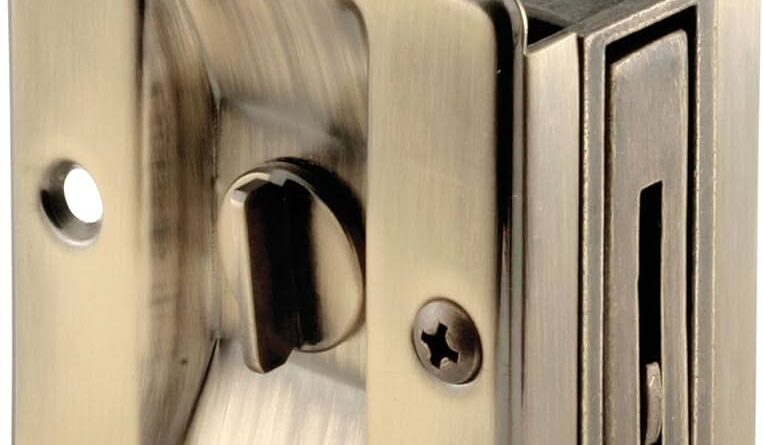
Choosing The Right Pocket Door Handle
Installing a pocket door handle requires selecting the right handle for your door. Understanding the different types of pocket door handles available is the first step. There are various options to choose from, such as flush pulls, edge pulls, and recessed pulls. Flush pulls are installed directly onto the door surface, creating a seamless look. Edge pulls, on the other hand, are mounted on the edge of the door, offering a minimalist appearance. Recessed pulls are embedded into the door, providing a hidden and sleek design.
When choosing a pocket door handle, there are several factors to consider. Firstly, the size and weight of the door should be taken into account to ensure the handle can adequately support it. Secondly, the material and finish of the handle should match the style of the door and the overall aesthetic of the room. Additionally, the handle’s functionality, such as the ease of use and durability, should be evaluated.
In conclusion, by understanding the different types of pocket door handles and considering the factors mentioned, you can make an informed decision and successfully install the perfect handle for your pocket door.
Preparing For Installation
Installing a pocket door handle can be a relatively simple and straightforward process. Before you begin, make sure you have gathered all the necessary tools and materials. You will need a measuring tape, a pencil, a screwdriver, and the pocket door handle kit which usually includes the handle, a latch, and screws.
Start by measuring and marking the door for handle placement. Measure the distance from the edge of the door to the centerline of the handle, typically around 36 inches from the floor. Mark this spot with a pencil. Next, locate the centerline of the door and mark it as well. These markings will serve as your guide for installing the handle at the correct height and position.
Once you have prepared the door, follow the manufacturer’s instructions to install the pocket door handle. This will usually involve attaching the latch mechanism to the door and then securing the handle in place using the screws provided. Make sure everything is securely tightened and test the handle to ensure it functions properly.
Step-by-step Installation Guide
To install a pocket door handle, start by removing the existing door handle if there is one. Once removed, proceed to install the template for the pocket door handle. Make sure it is aligned properly before drilling pilot holes for the handle screws. These holes will help secure the handle in place. After drilling the holes, attach the pocket door handle by inserting the screws into the designated spots. Use a screwdriver to tighten the screws and ensure the handle is securely fastened. Once installed, test the functionality of the handle by sliding the pocket door open and closed. This will ensure that the handle is working correctly and easily accessible for usage.
Troubleshooting Tips
Having trouble installing your pocket door handle? Don’t worry, we’ve got you covered. Here are some troubleshooting tips to help you resolve common installation issues:
- Ensure proper alignment: Make sure the door handle is aligned with the existing door hardware. Check if the latch lines up with the strike plate.
- Tighten screws: Check if all screws are securely tightened. Loose screws can cause the handle to become loose or malfunction.
- Check for obstructions: Ensure there are no obstructions or debris hindering the smooth operation of the pocket door. Clean the track if necessary.
- Adjust strike plate: If the latch doesn’t engage properly, adjust the strike plate by loosening the screws and moving it slightly until the latch aligns correctly.
- Test functionality: Operate the pocket door handle multiple times to ensure smooth and effortless functionality. Adjust as needed to optimize its performance.
By following these troubleshooting tips, you can successfully install your pocket door handle and enjoy its efficient operation. Remember to always refer to the manufacturer’s instructions for specific installation guidance.
Maintenance And Care
Regular cleaning and maintenance of your pocket door handle is essential to ensure its smooth functioning and longevity. To clean the handle, begin by removing any visible dirt or dust with a soft cloth or a brush. For stubborn stains, use a mild soap or a gentle cleaner diluted in water. Avoid using abrasive materials or harsh chemicals as they can damage the finish of the handle. After cleaning, wipe it dry thoroughly to prevent water stains.
In addition to regular cleaning, it is important to address any repairs or replacements as needed. Over time, the handle may become loose or squeaky. Tighten any loose screws and hinges to ensure stability. If the handle is damaged beyond repair, consider replacing it with a new one that matches the style and finish of your pocket door. Proper care and timely attention to maintenance will extend the lifespan of your pocket door handle and keep it looking as good as new for years to come.
Enhancing The Aesthetic Appeal
Installing a pocket door handle is a simple and effective way to enhance the aesthetic appeal of your interior space. When choosing a pocket door handle, it is important to consider both the decorative finishes and styles available. Selecting a handle that matches the overall interior design theme can contribute to a cohesive and visually pleasing look. Whether your design is modern, rustic, or traditional, there are numerous options to choose from. For a sleek and contemporary look, consider a handle with a polished chrome or brushed nickel finish. If your interior design leans towards a more vintage or ornate style, opt for a handle with an antique brass or oil-rubbed bronze finish. Whatever style you choose, ensure that the handle complements the door and seamlessly blends with the surrounding décor. By carefully selecting a pocket door handle that aligns with your design vision, you can elevate the aesthetic appeal of your space in a subtle yet impactful way.
Frequently Asked Questions On How To Install Pocket Door Handle
How Do I Install A Pocket Door Handle?
To install a pocket door handle, first measure and mark the spot where the handle will be placed. Then, use a drill to create holes for the handle and latch. Insert the handle and latch into the holes, and secure them with screws.
Finally, test the handle to ensure it functions properly.
Conclusion
So there you have it, a comprehensive guide on how to install a pocket door handle. By following these step-by-step instructions, you can easily upgrade the look and functionality of your pocket door. Remember to gather all the necessary tools and materials before you begin, and take your time to ensure a proper installation.
With the right handle in place, you can enjoy a smooth and seamless experience each time you use your pocket door. Happy DIY-ing!


